Making an App in python using Kivy - Part 2 - Widgets
In the first part I talked about how to create an app. Now I’m going to talk about the some of different widgets that can be used in Kivy, that I found helpful.
Widgets
In Kivy widgets are the building blocks of the GUI interface, which we created for our app. The main app takes 1 widget, as the root widget, when built.
Kivy includes examples of how to use each of the widgets. I would recommend looking through these to identify the best widget to use for each element of the app.
In the Hello World example from part 1 we see that on line 5 I imported the label widget, so that it can be used in line 11 to create an label. For each widget you want to use it is needed to be imported
Screen Manager
In most apps you will require a different layout for each type of page. For this I would recommend using the screen manager, although there are other options such as carousel depending on your needs.
Below is a sample of the different screens we used in our group last year.
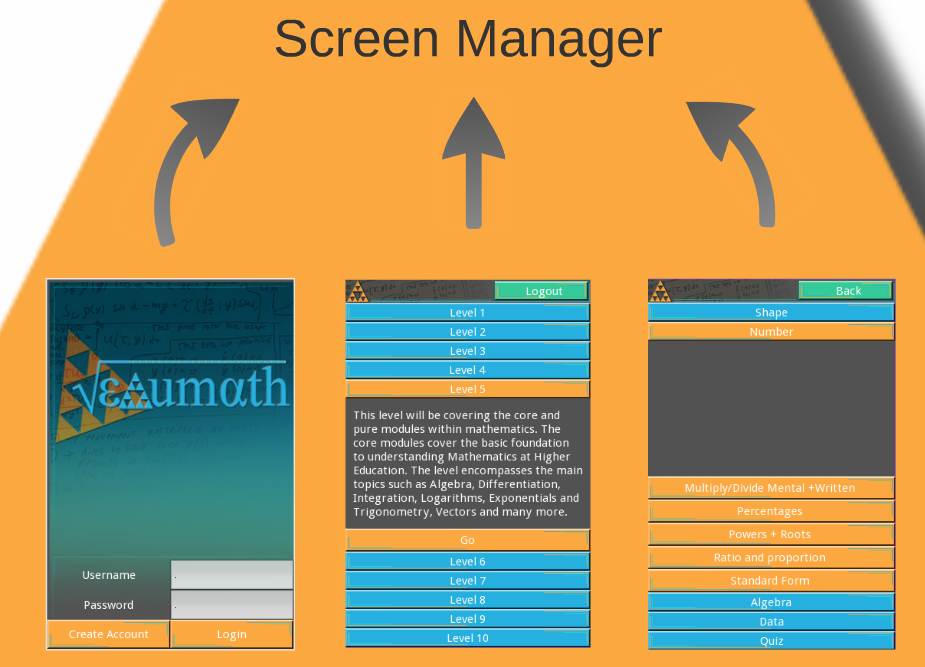
Note that the screen manager doesn’t need to be the root widget leading to the whole screen changing. For example you can have a vertical boxlayout (layouts are explained next), with an header as the first widget and the screen manager as the second.
from kivy.app import App
from kivy.uix.screenmanager import ScreenManager, Screen
from kivy.properties import NumericProperty
from kivy.lang import Builder

Builder.load_file('screenmanager.kv')


class CustomScreen(Screen):
    hue = NumericProperty(0)


class ScreenManagerApp(App):

    def build(self):
        root = ScreenManager()
        for x in range(4):
            root.add_widget(CustomScreen(name='Screen %d' % x))
        return root

if __name__ == '__main__':
    ScreenManagerApp().run()
The KV code is as follows
#:import random random.random
#:import SlideTransition kivy.uix.screenmanager.SlideTransition
#:import SwapTransition kivy.uix.screenmanager.SwapTransition
#:import WipeTransition kivy.uix.screenmanager.WipeTransition
#:import FadeTransition kivy.uix.screenmanager.FadeTransition
#:import RiseInTransition kivy.uix.screenmanager.RiseInTransition
#:import FallOutTransition kivy.uix.screenmanager.FallOutTransition
#:import NoTransition kivy.uix.screenmanager.NoTransition

<CustomScreen>:
    hue: random()
    canvas:
        Color:
            hsv: self.hue, .5, .3
        Rectangle:
            size: self.size

    Label:
        font_size: 42
        text: root.name

    Button:
        text: 'Next screen'
        size_hint: None, None
        pos_hint: {'right': 1}
        size: 150, 50
        on_release: root.manager.current = root.manager.next()

    Button:
        text: 'Previous screen'
        size_hint: None, None
        size: 150, 50
        on_release: root.manager.current = root.manager.previous()

    BoxLayout:
        size_hint: .5, None
        height: 250
        pos_hint: {'center_x': .5}
        orientation: 'vertical'

        Button:
            text: 'Use SlideTransition with "up" direction'
            on_release: root.manager.transition = SlideTransition(direction="up")

        Button:
            text: 'Use SlideTransition with "down" direction'
            on_release: root.manager.transition = SlideTransition(direction="down")

        Button:
            text: 'Use SlideTransition with "left" direction'
            on_release: root.manager.transition = SlideTransition(direction="left")

        Button:
            text: 'Use SlideTransition with "right" direction'
            on_release: root.manager.transition = SlideTransition(direction="right")

        Button:
            text: 'Use SwapTransition'
            on_release: root.manager.transition = SwapTransition()

        Button:
            text: 'Use WipeTransition'
            on_release: root.manager.transition = WipeTransition()

        Button:
            text: 'Use FadeTransition'
            on_release: root.manager.transition = FadeTransition()

        Button:
            text: 'Use FallOutTransition'
            on_release: root.manager.transition = FallOutTransition()

        Button:
            text: 'Use RiseInTransition'
            on_release: root.manager.transition = RiseInTransition()
        Button:
            text: 'Use NoTransition'
            on_release: root.manager.transition = NoTransition(duration=0)
Here we making the screen manager the root widget with there being 4 screens added to the manager. Each of the screens are similar with a different background colour and number.
If we take a look at the code for the next button in the KV we have
Button:
    text: 'Next screen'
    size_hint: None, None
    pos_hint: {'right': 1}
    size: 150, 50
    on_release: root.manager.current = root.manager.next()
- Text is the text that is displayed on the button
- size_hint is used by default to decide on how big a widget will be, it defaults to (1, 1).
- pos_hint
- size is how big the button is, note that if size_hint isn’t set to (None, None) then this doesn’t have an effect.
- on_release is the action that occurs once a user has click on and released the button.
Lets take a closer look at what on_release is doing. Firstly root refers to the custom screen as looking in the KV code it comes under CustomScreen. Next we are referring to the manager attribute of the screen which gives us the screen manager it’s attached to. We are then setting the current attribute of the screen manager to change the screen.
Now to see what it’s being set to we see that it follows the root.manager again. But this time we are using the next method of the screen manager to get the name of next screen. The next method looks at the screen_names, which is a list the screens added to the screen manager. The order in which next() and similarly previous() works is based upon the order that the screens were added to the screen manager.
Transitions
We also see that in the above example there are multiple transitions. The transitions are changed by changing the screen managers transition attribute.
Layouts
In order to have multiple widgets there are layout out widgets that allow multiple widgets to be attached to it.
There are 6 different layout widgets in kivy.
Of the different layouts in our we used boxlayout the most and grid for tables.
In the boxlayout example from part 1. We note that size hinting was used here but what does it do?
In the screen manager example we see that just size_hint was used. This took 2 values the first for the x direction and then for the y direction. But in the Boxlayout example they are changed separately.
So for the first block pictured below, it is a vertical boxlayout.
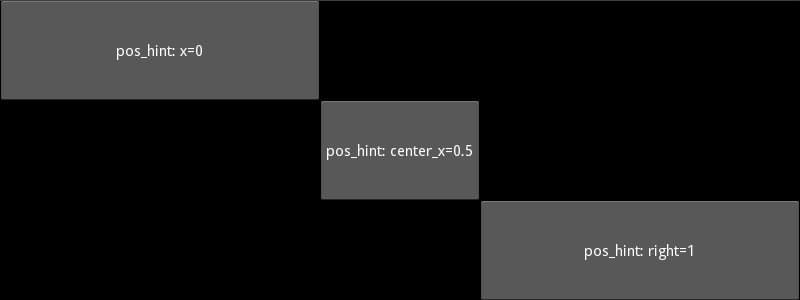
We see that the size_hint_y hasn’t been changed so virtually each button is taking up a third of the available space. What has been changed is the size_hint_x, so the first and the last buttons are only 40% of the available width that they were given. The second button is given 20% of the width. Due to the positioning of each button means that they don’t overlap.